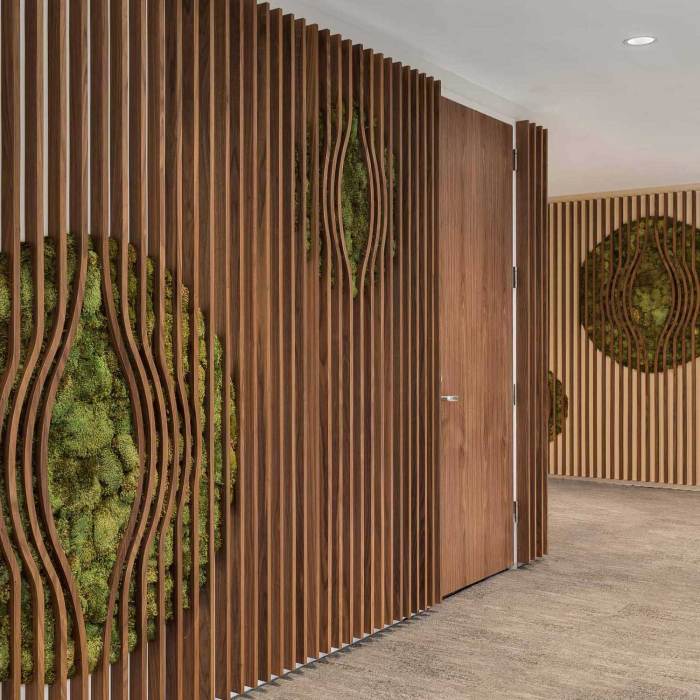
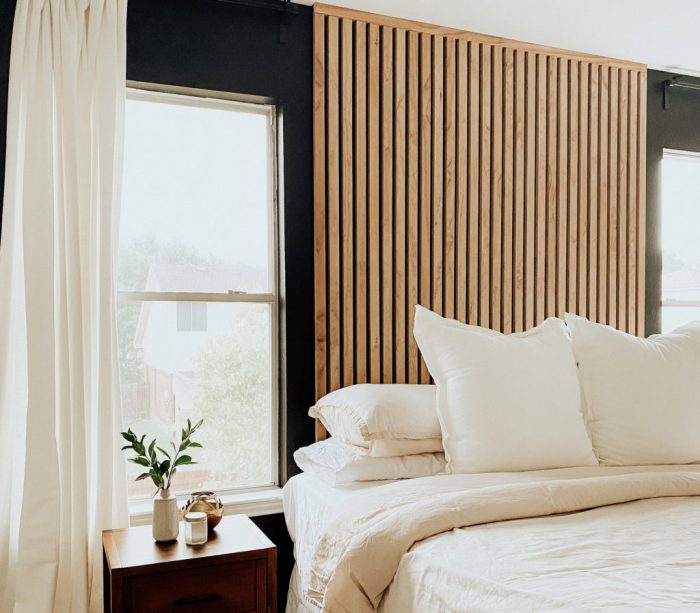
Wood Slat Decorative Walls Design & Installation
Wood slat decorative walls are a fantastic way to add warmth and character to any space. They come in various wood types, finishes, and styles, allowing for customization. From rustic cabins to modern apartments, these walls can dramatically transform the ambiance. Understanding the design considerations, material choices, and installation methods is key to pulling off a beautiful and lasting project.
This guide explores the entire process, from choosing the right wood and finish to achieving the perfect aesthetic. We’ll cover design options, installation techniques, maintenance, and cost considerations, making it easy for anyone to create a stunning wood slat wall.
Introduction to Wood Slat Decorative Walls
Source: Campbell-house.com
Wood slat decorative walls are a popular design element that adds warmth, texture, and visual interest to any space. They’re constructed from horizontal wooden slats, typically fixed to a backing, creating a unique and eye-catching aesthetic. The inherent natural beauty of wood, coupled with the ability to customize the design through various finishes, makes it a versatile option for diverse interior styles.
These walls offer a dynamic alternative to traditional wall coverings, allowing for a tailored look that blends seamlessly with the overall interior design. They can be used in both residential and commercial settings, adding a touch of rustic charm or a modern minimalist feel, depending on the chosen wood type and finish.
Wood Types Commonly Used
Wood slats for decorative walls come from a variety of sources. Different woods offer varying degrees of durability, color, and grain patterns. Popular choices include pine, cedar, redwood, and oak, each with its unique aesthetic. Pine, for example, is a more affordable option, while cedar boasts a natural resistance to moisture and decay, making it suitable for exterior applications. Redwood provides a warm reddish hue, and oak offers a robust, timeless look with a strong grain. The selection of wood will heavily influence the overall ambiance of the space.
Finishes and Treatments
The look of wood slat walls can be dramatically altered through different finishes. These can range from natural, unstained wood, to painted, stained, or even sealed surfaces. Natural finishes retain the raw beauty of the wood’s grain, while painted finishes can introduce a variety of colors to complement the interior design. Staining offers a way to deepen or lighten the wood’s natural tones, creating a more cohesive look with the surrounding décor. Treatments such as sealing, oiling, or varnishing enhance the wood’s durability and protect it from moisture damage. The choice of finish greatly impacts the final aesthetic appeal and the lifespan of the wall.
Historical Context and Evolution
The use of wood slats in wall construction dates back centuries. Traditional building techniques frequently employed wood planks or slats for walls and ceilings, reflecting the readily available nature of wood as a building material. In more modern times, wood slat walls have gained popularity as a decorative element, showcasing the enduring appeal of natural materials. The current resurgence of interest in rustic and natural aesthetics is a major driving force behind this design trend. Modern applications of wood slat walls demonstrate a continued evolution of this time-honored design element, incorporating contemporary styles and preferences.
Aesthetic Appeal and Visual Impact
Wood slat walls offer a distinct visual appeal. The horizontal lines create a sense of calm and spaciousness in a room. The natural texture of the wood adds warmth and depth to the space, making it more inviting and comfortable. The interplay of light and shadow on the slats further enhances the visual interest, especially when paired with strategically placed lighting fixtures. The overall aesthetic impact depends significantly on the specific wood type, finish, and the surrounding décor.
Typical Applications Table
| Wood Type | Finish | Typical Applications |
|---|---|---|
| Pine | Stained | Bedrooms, living rooms, kitchens |
| Cedar | Natural | Bathrooms, outdoor patios, interior spaces requiring moisture resistance |
| Redwood | Painted | Dining rooms, entryways, and spaces need a warm and inviting atmosphere |
| Oak | Oiled | Living rooms, offices, and areas emphasize a classic and durable look |
Design Considerations and Applications: Wood Slat Decorative Wall
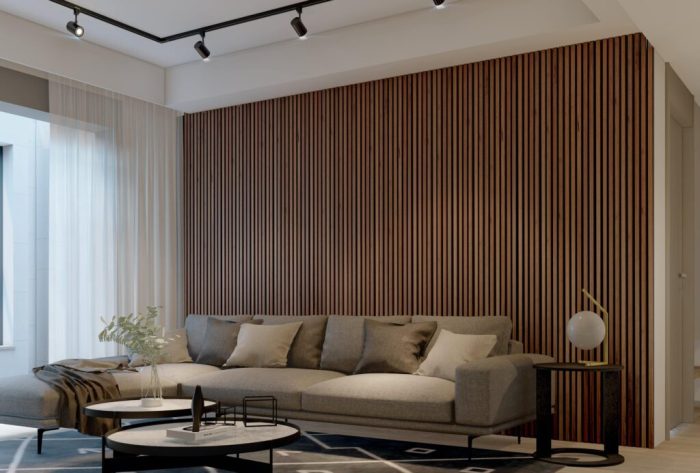
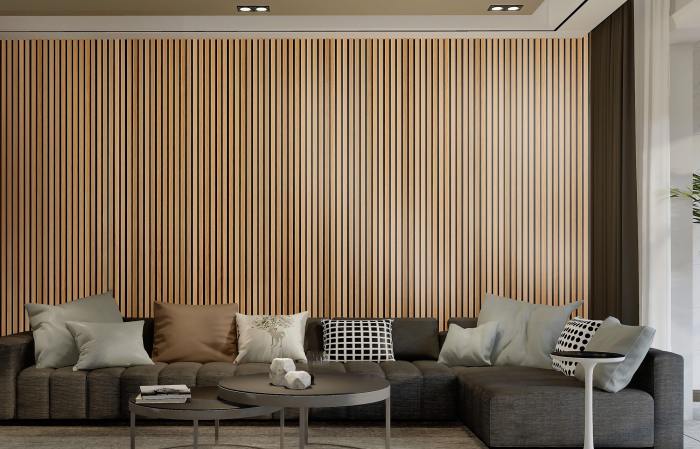
Wood slat walls offer a versatile and visually appealing way to add character to any room. They can transform a space from bland to captivating, offering a blend of natural beauty and design flexibility. Understanding the design considerations, from the impact of light to the effect of different slat arrangements, is key to achieving the desired aesthetic.
Wood slat walls are particularly adaptable to various design styles and room types, ranging from modern minimalism to rustic charm. The natural warmth and texture of wood complement diverse color palettes and furniture choices.
Room Suitability
Wood slat walls are well-suited for a variety of rooms, offering a unique touch to each space. The versatility of the material allows it to seamlessly integrate into different interior styles.
- Living Rooms: The warm, inviting ambiance of wood slats can create a cozy and welcoming atmosphere in living rooms. They can be paired with comfortable seating and a variety of decorative elements to enhance the space’s overall aesthetic.
- Bedrooms: The natural texture and calming effect of wood slats can contribute to a peaceful and serene bedroom environment. The subtle play of light and shadow can create a visually appealing backdrop for the room’s furnishings.
- Dining Areas: Wood slats can add a touch of rustic elegance or a modern flair to dining areas, depending on the specific design choices. The material’s versatility allows it to complement a variety of dining styles and décor.
- Bathrooms: In bathrooms, wood slat walls can create a spa-like atmosphere or a contemporary aesthetic, depending on the desired effect. The material’s water-resistant properties, when treated properly, make it a suitable choice for these spaces.
| Room Type | Suitability for Wood Slat Walls |
|---|---|
| Living Room | Excellent – Creates a warm and inviting atmosphere. |
| Bedroom | Excellent – Promotes a serene and calming ambiance. |
| Dining Room | Good – Adds a touch of rustic elegance or modern flair. |
| Bathroom | Good (with proper treatment) – Can create a spa-like or contemporary aesthetic. |
| Kitchen | Fair – Requires careful consideration of moisture and potential damage. |
Light Reflection and Ambiance
The way light interacts with the slats significantly impacts the overall ambiance of a space. The orientation and spacing of the slats influence the way light is diffused and reflected.
- Light Reflection: The reflective nature of the wood slats can brighten a room or create a softer, more diffused light. The direction of the slats about natural light sources is crucial for achieving the desired effect.
- Ambiance Creation: A well-designed slat wall can create a warm and inviting atmosphere. The play of light and shadow on the slats can add depth and dimension to a space.
Slat Arrangement
The arrangement of slats—vertical, horizontal, or diagonal—creates distinct visual effects.
| Slat Arrangement | Visual Effect |
|---|---|
| Vertical | Creates a taller, more slender impression, and emphasizes the verticality of the room. |
| Horizontal | Gives a sense of width and expands the perceived space. Often used for creating a sense of calm and tranquility. |
| Diagonal | Adds a dynamic and visually engaging element, creating a more dramatic and contemporary feel. |
Slat Spacing
The spacing between the slats impacts the visual perception of the wall.
- Visual Perception: Narrow spacing can create a more dense and textured wall, while wider spacing creates a more open and airy feel.
Design Styles
Wood slat walls can seamlessly integrate into a wide range of design styles.
- Modern Minimalism: Clean lines and simple slat arrangements create a sophisticated and contemporary look. A neutral color palette complements this style.
- Rustic Charm: Natural wood tones and wider slat spacing can evoke a warm and inviting atmosphere. Natural materials and textures are key elements.
- Coastal Elegance: Light wood tones and horizontal slat arrangements can create a calming and refreshing coastal aesthetic. The natural elements complement the overall design.
Material Selection and Construction
Choosing the right wood and construction methods is crucial for a long-lasting and beautiful wood slat wall. Proper material selection, fastening techniques, and protective treatments will significantly impact the wall’s lifespan and aesthetic appeal. Consider factors like climate, intended use, and budget when making these decisions.
Understanding the nuances of wood types, moisture control, and installation methods will ensure your project is a success. A well-constructed wood slat wall will not only enhance your space but also withstand the test of time.
Wood Types for Indoor and Outdoor Use
Different wood species possess varying characteristics, making some more suitable for indoor applications and others for outdoor exposure. Indoor walls can often tolerate more variability in wood types, whereas outdoor walls require woods with higher resistance to moisture and decay.
- Indoor Use: Softwoods like pine, fir, and cedar, and hardwoods like maple, oak, and walnut, are popular choices. Their lower cost and workability make them attractive for interior applications. Consider the aesthetic qualities of each wood when selecting for your project.
- Outdoor Use: Woods with high natural durability, like pressure-treated lumber, cedar, redwood, and ipe, are better suited for exterior installations. These species resist moisture, rot, and insect damage more effectively, which is essential for outdoor longevity.
Importance of Moisture Control
Moisture is the enemy of wood, leading to warping, cracking, and decay. Preventing moisture ingress is paramount for the longevity of any wood slat wall.
- Proper Installation: Ensure proper drainage around the wall, particularly in exterior applications. Installing the wood slats in a way that prevents water from pooling or accumulating behind them is essential. Using a sealant is crucial to create a moisture barrier.
- Regular Maintenance: Inspect the wall regularly, especially after periods of rain or high humidity. Addressing any moisture issues promptly can prevent significant damage. If moisture is detected, promptly address the issue to prevent rot or warping.
Fastening Methods for Wood Slats
The right fastening method ensures the slats stay securely in place and are strong enough to withstand potential stresses.
- Exterior Applications: Use galvanized nails or screws for exterior installations. These are designed to resist rust and corrosion, extending the life of the fasteners and the wall. Use a sealant on any exposed fastener points to further protect against moisture.
- Interior Applications: Wood screws are often preferred for interior projects due to their versatility and aesthetic appeal. Ensure the screws are appropriate for the wood type and the thickness of the slats. Pilot holes are often recommended for better installation and to prevent splitting.
Sealant and Finish for Long-Term Protection
Applying a sealant and finish is crucial for protecting the wood from moisture, UV rays, and insects, thereby enhancing its longevity.
- Sealant: A sealant creates a barrier against moisture, preventing water absorption. Choose a sealant appropriate for the intended use (indoor or outdoor). It’s crucial for exterior applications to ensure the wood does not absorb moisture, preventing rot and decay.
- Finish: A finish not only enhances the aesthetic appeal but also provides a protective layer. Choose a finish that is appropriate for the specific wood and intended use. Interior finishes are often more focused on aesthetics and durability, while exterior finishes prioritize resistance to weather conditions.
Common Wood Slat Wall Installation Methods
Several installation methods exist, each with its advantages and disadvantages. The best method depends on factors like the size of the wall, the type of wood, and the desired aesthetic.
- Overlap Method: Slats are overlapped to create a tight and secure fit, often used in exterior applications. This method requires precise measurements and careful alignment.
- Butted Method: Slats are placed side-by-side, with minimal gaps. This method is simpler than the overlap method but may require additional sealing to prevent moisture ingress. This is often preferred for interior applications.
Wood Type Comparison
| Wood Type | Durability | Maintenance |
|---|---|---|
| Pressure-treated Pine | High | Moderate (periodic sealing) |
| Cedar | High | Low (natural resistance) |
| Redwood | High | Low (natural resistance) |
| Ipe | Very High | Very Low (virtually maintenance-free) |
| Oak | High | Moderate (periodic sealing and cleaning) |
Visual Aesthetics and Styling
Wood slat walls offer a versatile canvas for personal expression. Their inherent texture and natural beauty can be amplified through careful consideration of color, lighting, and complementary design elements. This section explores various ways to elevate the visual appeal of your wood slat wall, transforming it from a simple feature to a captivating focal point.
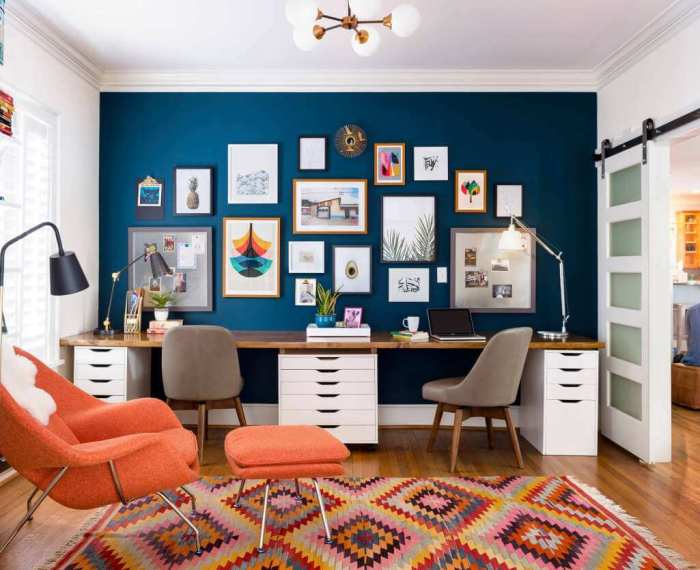
Combining wood slat walls with other design elements can create a cohesive and visually appealing space. Consider using contrasting textures, like smooth stone or woven baskets, to add visual interest. Introduce pops of color through textiles or artwork that echo the wood tones. For instance, a room with a light gray wood slat wall could benefit from bold, patterned throw pillows or a vibrant area rug. Strategic placement of furniture, mirrors, or even plants can further enhance the overall aesthetic.
Combining with Other Design Elements
Different materials and textures can add depth and visual interest when paired with wood slat walls. For instance, a sleek, modern fireplace with polished granite or a rustic wooden mantelpiece will create a contrasting yet complementary aesthetic. Introduce metallic accents like copper or brass to further enhance the modern appeal.
Impact of Color Palettes
The color palette surrounding a wood slat wall significantly impacts the overall ambiance. Warm tones like beige, cream, or light brown enhance the natural beauty of the wood, creating a cozy and inviting atmosphere. Cooler tones like gray or white create a more contemporary and minimalist feel. The choice depends on the desired mood and the overall interior design theme. A vibrant color palette, like blues or greens, can be used to create a bold and energetic space.
Lighting Techniques
Lighting plays a crucial role in showcasing the unique beauty of wood slat walls. Ambient lighting, such as recessed lighting or strategically placed pendant lights, creates a soft glow that highlights the texture of the slats. Accent lighting, such as spotlights or LED strips, can be used to emphasize specific areas of the wall, like a gallery wall or a decorative piece. Natural light can also be a powerful element, maximizing the wall’s natural beauty. Consider using sheer curtains to filter sunlight and create a warm, inviting ambiance.
Incorporating into Interior Design Themes
Wood slat walls seamlessly integrate into various interior design styles. A rustic cabin design benefits from the natural warmth of a light brown wood slat wall, while a modern minimalist space can feature a sleek gray or white wall. For a bohemian vibe, consider a rich, warm brown or a textured, reclaimed wood slat wall to accentuate the natural aesthetic. The key is to choose a wood slat wall that complements the overall design and enhances the chosen theme.
Adding Textures to the Wood Slat Wall
Adding textures to the wood slat wall can enhance the visual appeal. Consider using decorative wall hangings, tapestries, or textured fabrics to create visual interest. Natural elements like dried flowers or branches can be incorporated to create a sense of nature. Paint or stain the wood in different tones to create visual depth.
Color Palettes and Their Effect
| Color Palette | Effect |
|---|---|
| Warm Tones (Beige, Cream, Light Brown) | Cozy, Inviting, Enhances Natural Beauty |
| Cool Tones (Gray, White) | Contemporary, Minimalist, Modern |
| Vibrant Tones (Blues, Greens) | Bold, Energetic, Dynamic |
Lighting Options for Accentuating the Slat Wall
| Lighting Option | Description |
|---|---|
| Ambient Lighting (Recessed, Pendant) | Soft glow, highlights texture |
| Accent Lighting (Spotlights, LED Strips) | Emphasizes specific areas |
| Natural Light | Maximizes natural beauty, filtered with sheer curtains |
Maintenance and Durability
Source: walldecor3d.com
Keeping your wood slat wall looking its best and lasting for years requires a little proactive care. Proper maintenance not only preserves the aesthetic appeal but also significantly extends the lifespan of this beautiful feature. Regular cleaning and minor repairs will prevent larger problems down the line, saving you time and money in the long run.
Understanding the different types of wood, the finishes used, and the environment the wall is exposed to will influence the best approach to its upkeep. This will ensure that your investment remains a stunning focal point for many years to come.
Cleaning Methods
Regular cleaning is crucial for maintaining the pristine appearance of your wood slat wall. The best approach depends on the type of finish. For unfinished wood, a damp cloth or a soft brush will often suffice. For varnished or stained walls, a slightly damp cloth or a soft brush, and mild cleaning solutions are usually the best options. Avoid harsh chemicals, as they can damage the finish and the wood itself. Test any cleaning solution in an inconspicuous area first.
Repairing Minor Damage
Minor damage, like small scratches or dents, can be easily addressed. For minor scratches, a wood filler or a touch-up pen can effectively mask the imperfection. For more significant damage, you might need to replace the damaged slat. Carefully examine the damage to determine the best repair method. Always use appropriate tools and follow the manufacturer’s instructions for any wood fillers or finishes.
Protective Treatments
Applying a protective sealant or finish can significantly extend the lifespan of your wood slat wall. A good quality varnish or sealant will help to repel moisture, prevent staining, and protect the wood from UV damage. The choice of treatment depends on the specific type of wood and the desired aesthetic. For example, a clear coat will preserve the natural beauty of the wood, while a colored stain will add a deeper tone and visual interest. Always follow the manufacturer’s instructions for application and drying times.
Repairing Damaged Slats
Replacing damaged slats is essential for maintaining the integrity and visual appeal of the wall. To replace a slat, carefully remove the damaged one. Use a similar slat from your existing stock or, if necessary, purchase a replacement. Ensure the new slat matches the existing ones in color and style. Secure the new slat with appropriate fasteners and finish the repair with matching wood filler and sealant if needed.
Maintenance Schedule
A consistent maintenance schedule is key to long-term preservation. A well-planned approach ensures the wall remains in optimal condition. Regular inspections will catch potential issues before they become significant problems. This proactive approach will keep the wall looking its best and extend its lifespan.
| Maintenance Task | Frequency |
|---|---|
| Regular dusting and cleaning | Weekly |
| Inspection for damage or loose slats | Monthly |
| Deep cleaning (using mild soap and water) | Quarterly |
| Re-application of protective sealant (if applicable) | Annually or as needed |
Cost Considerations
Source: thenavagepatch.com
Budgeting for a wood slat wall project involves more than just the material cost. Installation labor, finishing touches, and potential unforeseen expenses all contribute to the overall price. Understanding these factors upfront is key to avoiding unpleasant surprises later on.
A well-planned approach considers all these variables, allowing you to make informed choices about materials and installation methods. Careful cost analysis ensures your project stays within budget and delivers the desired aesthetic.
Material Costs Breakdown
Different wood types have varying price points. Higher-quality hardwoods like oak or cherry will command a premium compared to softerwoods like pine or fir. Consider the longevity and visual appeal you desire when making your selection. This affects the final cost of your project significantly.
- Hardwoods (Oak, Maple, Cherry): These woods are prized for their durability and rich tones, but their higher cost reflects this quality. Expect to pay more per square foot for these options.
- Softwoods (Pine, Fir, Cedar): Softwoods are more affordable, making them a popular choice for budget-conscious projects. Their softer nature might require more careful finishing to achieve the desired aesthetic.
- Specialty Woods (Bamboo, Reclaimed Wood): Specialty woods, such as bamboo or reclaimed wood, often come with unique characteristics that impact the cost. The price of these options will vary based on availability and the particular features sought.
Installation Costs
Installation costs vary widely based on the complexity of the project and the chosen installation method. Professional installation ensures a clean and accurate finish, but it also carries a higher price tag. DIY installation can save money, but requires more time and effort, potentially leading to errors that require additional work later on.
- Professional Installation: Hiring professionals ensures precision and speed, minimizing errors. However, this method typically incurs higher labor costs.
- DIY Installation: This method allows significant cost savings. However, proper planning and execution are crucial to avoid costly mistakes. The time commitment and potential for errors should be carefully evaluated.
- Installation Complexity: Projects with intricate designs or larger wall areas will inevitably involve more labor hours, impacting the total installation cost.
Finishing Costs
Finishing touches, such as stains, paint, or varnish, are essential to protect the wood and enhance its appearance. Different finishes have different price points. The cost of finishing materials should be factored into the overall budget.
- Staining: Stains offer a natural look, but the cost can vary depending on the type of stain used and the coverage required.
- Painting: Painting offers a wide range of colors and finishes, but the cost will depend on the paint type and the amount needed.
- Varnishing: Varnishes provide a protective layer and enhance the wood’s shine. Their cost varies based on the type and application requirements.
DIY Cost Savings
DIY installation can significantly reduce the project’s total cost. Careful planning, sufficient tools, and a realistic assessment of your skills are crucial to success. Before undertaking a DIY project, carefully weigh the time commitment and potential risks.
- Tool Acquisition: Consider the cost of tools needed for installation, like specialized measuring tools, power tools, and safety equipment. These expenses might be significant if you don’t already have the necessary tools.
- Time Investment: Factor in the time required for the project. The cost of labor saved by doing it yourself is often balanced by the time investment. A realistic timeline is essential for planning.
- Potential Errors: Installation errors can lead to costly corrections. Consider the potential for mistakes and the cost of rectifying them.
Estimated Costs Table
| Wood Type | Installation Method | Estimated Cost (per sq ft) |
|---|---|---|
| Pine | DIY | $5-$10 |
| Pine | Professional | $10-$15 |
| Oak | DIY | $15-$25 |
| Oak | Professional | $20-$30 |
| Reclaimed Wood | Professional | $25-$40 |
Note: These are estimated costs and may vary based on location, specific materials, and project size.
Inspiration and Examples
Wood slat walls offer a versatile design element, transforming spaces with a touch of rustic charm or modern elegance. They can be incorporated into various settings, from cozy living rooms to sleek kitchens, breathing new life into any room. Understanding how different wood tones, finishes, and installations affect the overall aesthetic is key to unlocking the full potential of this popular design choice.
Wood slat walls are more than just a pretty face; they contribute significantly to the ambiance and feel of a space. The warmth of natural wood, combined with the adaptable nature of slatted designs, allows for a range of styles and moods. Whether you desire a relaxed, rustic feel or a contemporary, sophisticated look, wood slat walls can help achieve it.
Different Settings and Applications, Wood slat decorative wall
Wood slat walls are incredibly adaptable and can be incorporated into a variety of spaces. Their ability to seamlessly blend into various styles and environments makes them a popular choice for homeowners. From cozy bedrooms to modern kitchens, wood slat walls have the potential to transform any room.
- Living Rooms: A living room with a wood slat wall can evoke a warm and inviting atmosphere. The natural wood tones can create a sense of tranquility and connection with nature. The slats can be arranged in a variety of patterns, adding visual interest to the space. Consider a light gray or white paint for the walls adjacent to the slatted wall to maintain a bright and airy feeling. Using warm-toned lighting, such as pendant lights or floor lamps, can further enhance the cozy ambiance.
- Kitchens: In a kitchen, a wood slat wall can provide a unique backdrop that complements various kitchen styles. The natural texture of wood can bring a touch of warmth to a contemporary kitchen, or create a rustic feel in a farmhouse-style kitchen. For a kitchen, the slat wall could be a backsplash, adding both visual interest and functional touch. Consider dark-stained wood for a kitchen to create a dramatic backdrop, contrasting with lighter countertops and cabinets.
- Bedrooms: Wood slat walls in bedrooms can create a calming and serene atmosphere. The natural warmth of the wood can promote a sense of tranquility and relaxation. Use a lighter wood stain to maintain a light and airy feel in a bedroom. A soft, muted color palette for the rest of the room can create a relaxing atmosphere. Consider using soft lighting and natural fabrics to complete the look.
- Bathrooms: While less common, wood slat walls can be incorporated into bathrooms with careful consideration of moisture resistance. A waterproof, sealed wood can create a unique feature wall in a bathroom, adding a touch of warmth and natural beauty. A light wood tone in a bathroom will create a spacious and airy atmosphere. Ensure the wood is treated to withstand moisture to avoid damage.
Inspirational Projects and Moods
Various projects showcase the versatility of wood slat walls. The different applications, design choices, and finishes can drastically alter the mood and aesthetic of the room. Different wood tones and finishes offer varied visual effects, adding unique character to each space.
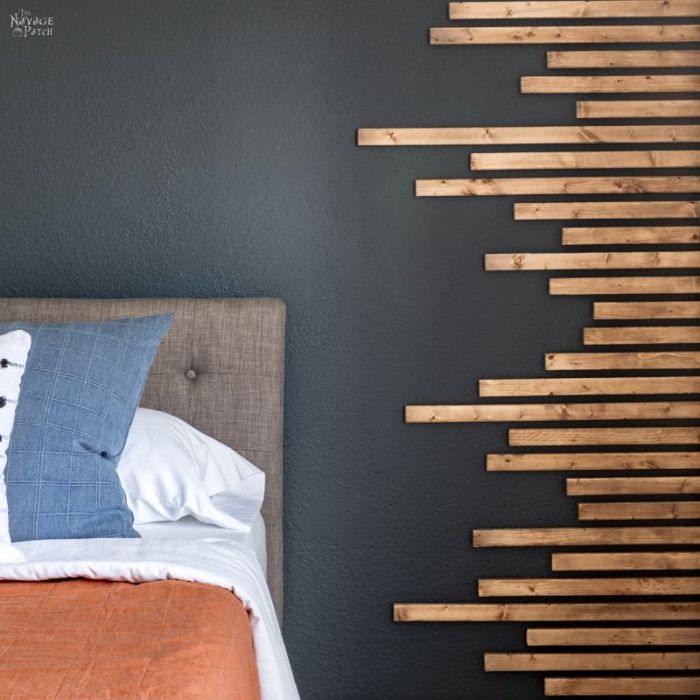
- Rustic Farmhouse: A rustic farmhouse style can be achieved with a light-colored wood slat wall, stained to a natural or slightly darker tone. The wood slats could be arranged in a staggered pattern, creating a visually appealing texture. A natural wood stain and complementary accessories will evoke the feeling of warmth and simplicity. The space would benefit from natural light and warm lighting.
- Modern Minimalist: A modern minimalist design could incorporate a wood slat wall with a sleek, light-colored stain or a painted finish. The slats could be placed vertically or horizontally, emphasizing clean lines. Use minimal accessories and incorporate natural elements to create a minimalist aesthetic.
- Coastal Retreat: A coastal retreat might feature a light-colored wood slat wall, perhaps a light beige or gray-toned stain. The wood slats could be arranged in a horizontal pattern. Use light-colored furniture and incorporate natural elements like plants to evoke a seaside ambiance. Light and airy fabrics are also a good choice.
Materials and Design Choices
The selection of materials and design choices significantly impacts the final look and feel of a wood slat wall. Different wood types, stains, and finishes can create unique effects.
| Material | Design Choice | Aesthetic Impact |
|---|---|---|
| Pine | Light stain | Warm, inviting, and natural |
| Cedar | Natural finish | Rustic, earthy, and calming |
| Oak | Dark stain | Sophisticated, dramatic, and bold |
| Bamboo | Painted white | Contemporary, clean, and airy |
Last Point
Source: walldecor3d.com
In conclusion, wood slat decorative walls offer a versatile and visually appealing design solution. By carefully considering the design, materials, and installation process, you can achieve a unique and personalized look that enhances any room. Remember to prioritize durability and longevity by selecting appropriate woods and finishes, as well as implementing proper maintenance strategies. Ultimately, these walls bring a touch of natural beauty and artistic flair to your space.